How to Upload a PST File to Outlook Web Access – Trouble-Free Method
The article deals with the query how to import PST file in Outlook Web Access? Outlook is an efficient email application which is preferred by most of the users all over the world. Outlook can be accessed through Outlook Web Access (OWA) when configured with Office 365 application. In this way,users can access their emails in Office 365 account. To find the solution,first discuss the given scenarios –
- How to move Outlook PST files stored locally within the system?
- How to import PST files where the account is configured by default?
In the first case,PST file is locally saved on the system so users can use Microsoft AzCopy Tool to move PST file in Exchange Online account. For the second case,the users first need to export mailbox data into PST format using Import/Export Wizard.
Let us first discuss the steps to move mailbox items –
- Open Outlook application and click on File option
- Click on Open & Export option and select Import/Export wizard
- Select Export to a file and select Outlook (.pst) file format
- Select Mailbox items and sub folders whom you want to import in Office 365 application
- Browse the output location to save the resultant PST file and finally hit the Finish button
With these steps,PST file gets locally stored in your system. Use Network Upload method to import PST file in Outlook Web App. The complete process is divided into the following sections.
Section 1. Install Azure Azcopy and Copy SAS URL
- Go to https://protection.office.com/link
- Provide Microsoft Office 365 login credentials
- Select Security & Compliance center. Choose Data governance and then select Import
- Open Import wizard and click on New Import Job option with a unique name in lower case and hyphens
- Select Upload your data option
- Click on Azure AzCopy option to download the latest Azure AzCopy Tool
- Run the tool so that PST files will be imported to OWA
- Now,Run Command Prompt and add AzCopy.exe /Source:/Dest:/V:/Y
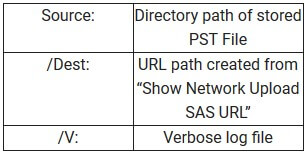
Now run the above command and you can view the same path in the below image –

Section 2. Create PST Import Mapping File
Once the PST file is uploaded in the Azure location,now we need to move it to Office 365. For this,create a CSV file with user mailbox of PST file.
Section 3. Create PST Import Job in Office 365 Application
- Check the options I upload my files and I have accessed to the mapping file.
- In the next window,you need to add created CSV file using the Select Mapping File. When CSV is validated successfully,the analysis process started so that it can be ready to migrate Office 365 environment.
- When the analysis process gets completed,you can get different options such as "Yes I want to filter it before importing" and "No I want to import everything"
- If you want to import complete mailbox data to Office 365,go for the second option. When the process gets completed,open Office 365 application to view the PST file and now use OWA to access it.
Alternate Solution to Open PST File into OWA
As you will find the above solution comes with lots of steps. Even downloading different tools to move and check details is a cumbersome task and Administrator should have experience on these tools so that any error can be fixed easily. To come out of all these issues,use Softaken PST to Office 365 Migration Tool.
With this automated tool,you are only a few steps away to open your PST file into Outlook Web App. The application migrates complete mailbox of PST with all details.
Important Note:If your Outlook PST file is in corrupt/damage state or inaccessible in your account,then it is important to fix these issues by repairing PST file then only you can import PST file into Outlook Web App. To repair and recover PST file,you can use Outlook PST Repair Tool. And after recovery of PST file,you can access PST file in OWA with the above-stated migration Tool.
Final Words
To learn to open PST file into Exchange Online we have discussed the manual and automated solution to do the same. A free technique is more preferred by users as it is free but you can simply analyze the disadvantages of the manual method and can understand now why the software solution is mostly suggested by the experts.