How to Import Outlook Express DBX Files into MS Outlook
The complete guide provides essential information on the Outlook Express to Outlook PST conversion procedure. It also emphasizes the methods using which users can export DBX files to Outlook PST when both Outlook & Outlook Express are installed on the same machine. Everybody knows that MS Outlook Express is a free email client that comes with a simple GUI as a mailing program.
Outlook Express relies on the DBX architecture, where each individual mailbox folder is stored separately as a database file. Microsoft Outlook uses a PST file as an entire profile's database. Because these two internal storage architectures are different, users cannot simply drop a raw DBX file into a modern Outlook profile. For example, if users have a separate machine to access Outlook and Outlook Express, they must find and copy all the folders as required to transfer Inbox.dbx to Outlook.
Ways to Import Outlook Express DBX Files into Outlook
Here are some simple and easy techniques to import Outlook Express emails to Microsoft Outlook:
Method 1: Both Outlook and Outlook Express Configured on the Same Machine
First, open the Import and Export Tool to move DBX files into PST. Select the appropriate option depending on the MS Outlook version installed on your computer:
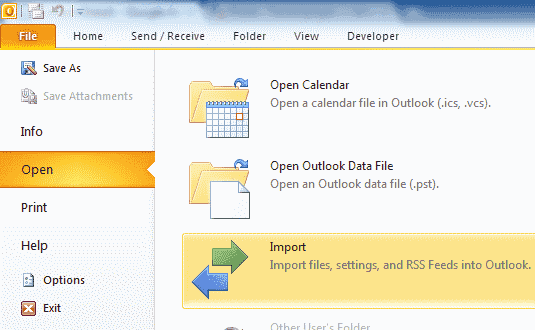
- For MS Outlook 2010, click on File > Open > Import.
- For MS Outlook 2007, open the File menu and click on the Import and Export option.
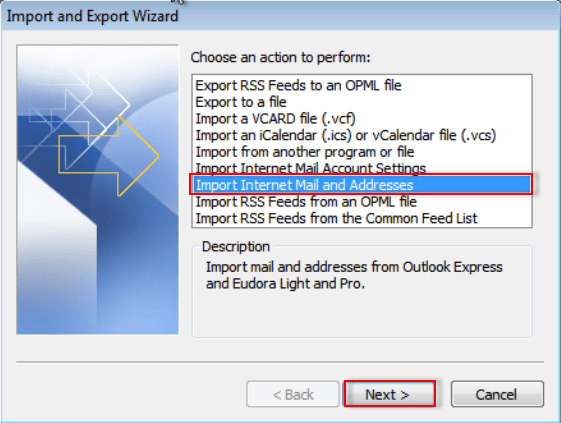
- After this, click on Import - Internet Mail and Addresses > Next.
- Choose MS Outlook Express and then select the Import Mail checkbox.
- Click on Next, then click on the Finish button, and then the Save in Inbox option can be chosen. This saves a copy of the import summary in the Inbox to export .dbx files to Outlook.
Method 2: Outlook and Outlook Express Working on Different Machines
To use this method, first locate the stored folders of Outlook Express, copy them, and move them to the machine where Outlook is configured.
To copy the MS Outlook Express information to the shared location, follow the step-by-step process below:
- To begin the process, locate and copy the Outlook Express folders.
- Go to the Tools menu in the Outlook Express program where your email account is set up.
- After this, click on Options and select the Maintenance tab.
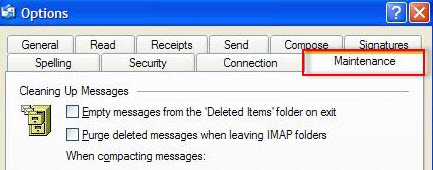
- Select the Store Folder button in the Outlook Express program dialog box.
If you want to view the files, you might need to enable hidden folders in Windows Explorer, as the Outlook Express folder is located inside hidden system directories. Once the folders are copied over to the destination machine, choose the options to migrate DBX files to Outlook:
- For Microsoft® Outlook 2010, click File > Open > Import.
- For Microsoft Outlook 2007, choose File > Import and Export.
- Select Import Internet Mail Account Settings and click Next.
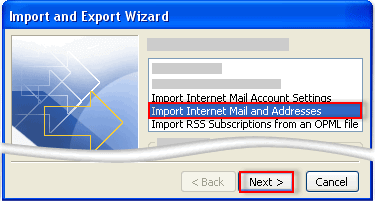
- Select Outlook Express and click Next.
Once the process is over, the contacts and settings will be synchronized.
Method 3: The Automated Route via Softaken DBX to PST Converter
While manual methods are options, they are highly time-consuming and prone to errors. Third-party software solutions offer a reliable, secure, and time-saving alternative. If you have bulk mailboxes or want to ensure a smooth transition, the best option is to utilize the Softaken DBX to PST Converter tool.
This utility facilitates bulk email migration, exporting DBX files to PST and other formats. It is trustworthy and does not require an active Outlook installation on your PC to perform the conversion.
Quick Conversion Steps:
- Step 1: Download and start the Softaken DBX to PST Converter on the Windows PC.
- Step 2: Click the Browse button to add individual files or an entire folder containing the DBX backups.
- Step 3: Review the automatic live folder tree preview to examine all email text and attachments before continuing.
- Step 4: Select PST as the target output file format from the export selection pane.
- Step 5: Set the preferred destination path on the drive and click Convert Now to complete the transition.
Conclusion
Users often look for manual methods initially. However, manual processes are complicated, consume a significant amount of time, and require technical expertise. In contrast, professional help through the Softaken DBX to PST Converter is highly recommended for a smooth and safe transition. Download the free trial version today to scan and preview your legacy folders seamlessly!