Change Email Settings from IMAP to POP3
The users need to change the email settings from IMAP to POP3 because,IMAP protocol enables users to sync their data in the server,but using this protocol,it is not possible to save the data offline. POP3,it is used to store the downloaded emails from the server to the local system.
This migration ensures all email data is stored directly on the local machine,reducing server storage overhead. This is ideal for creating a permanent local archive and reducing server storage limits. It also enables full access to your email history when you are offline.
.
IMAP vs POP3 and 3-Phase Migration
In Outlook 2007,the auto-discovery protocol is less defined and accurate. IMAP and POP are different formats where,IMAP uses an OST file to mirror a server,while POP3 uses PST files to store data locally.
There is a 3-Phase Migration workflow to export from IMAP to POP3.
Just Add POP3 Account
In Outlook 2003 version
- At first,choose Tools
- Click on email Account
- Select the options
- Select:Add an email account.
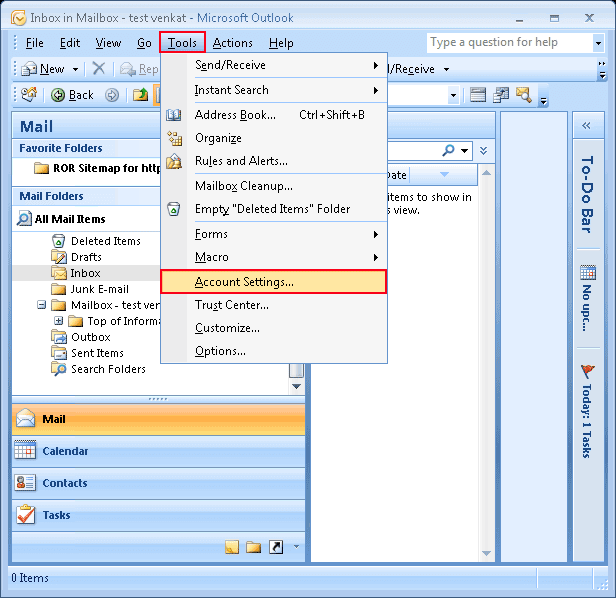
2007 version
- Firstly,choose Tool
- Click account Settings
- Click on the new tab –
- Add a new email account.
2010 and 2013:
- Choose the File
- Select the option info.
- Click account Settings.
- Add email account
In Outlook 2007,2010,2013,it uses a feature called auto discover in which the user fills details,name,email,and password then outlook queries the mail server to find the configuration file. Most of the modern mail server like Gmail take IMAP as default because it allows for multi device syncing but if you want POP3,the user must check manual set up to stop Outlook from automatically creating IMAP file.
Move the Mail Folders
Synchronizing Historical Data. When you activate POP3,it only downloads the main server's inbox. It is not able to see your existing file or folders,and even the sent items. To download all the data,the user must manually send these directories to the new PST file.
This ensures all historical communication is preserved locally. The Drag and Drop option can be used to easily export the selected messages.
Note:Users can use the simple technique by selecting all the items CTRL+A and then easily drag and drop them to the new PST file.
Data Integrity &Metadata retention is not damaged.
The status of read and unread messages will not change,even if you export the content to the new account. It helps to avoid duplicate messages.
Delete Current IMAP Account
Before deleting the old account,make sure that your,each message and folder is visible in the new POP3 format. Specifically,in Outlook 2013,you must do one step that Click the data files and set the PST file as the default before deleting the account. Removing the current IMAP account,it helps in preventing accidental duplication and ensures Outlook only communicates via the new protocol.