Add Source Mailbox
Method 1: Steps to Add Exchange Server Mailboxes: -
You can easily add the live Exchange Server Mailboxes (On Premises Exchange) into the required software by following the mentioned. Once you are done with these steps, all you have to do after adding these mailboxes is Export and Save all the items in the desired files.
- Enter the Domain Name/IP: The first step is to enter the Server name or the IP address of the Server. This is the place where your Active Directory is installed.
- Enter Username: Now you have to enter the username or Email of the person who has all the administrative right.
- Enter Password: Once you have entered the username or Email of the concerned person, enter the password of the Administrative User.
Once you have entered all the details, click on the Next button. There are chances when you might find an error message after clicking the Next button. In that case, you can select other option, i.e. 'Select admin Outlook Profile to connect.'
If you have selected Select admin Outlook Profile to connect, in that case you need to click on the Outlook Profile of the admin and then click on the Next button that you will find on the screen.
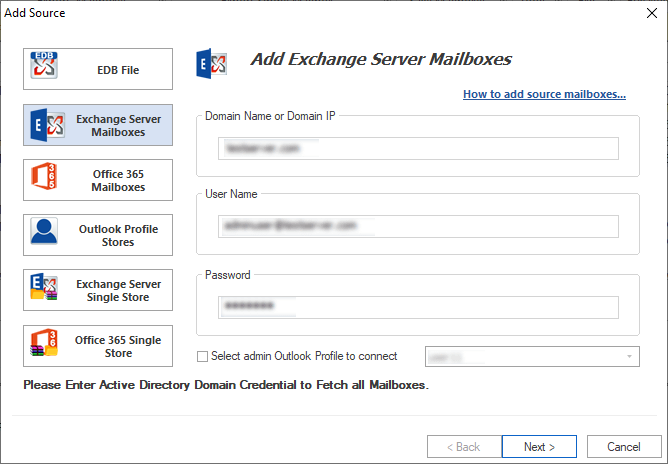
There are chances that you will get the error message again. In that case, we will recommend you to create a unique Outlook Profile of the admin user of the Exchange. You must make sure making it online. Use 'Outlook Profile Stores' option after the profile has been created.
Once you have followed all the above steps, you will see all the mailboxes displayed in front of you by the software. There, you can multiple mailboxes as per your preference.
Method 2: Steps to Add Office365 Mailboxes: -
You can add Office 365 Mailboxes present in Online Exchange Server into the software by following the steps that we have mentioned below. The process begins with entering all the required details, once done you can easily Export and save the items in desired files.
- Enter the Office365 Username: - The first step is to enter the global admin user of office 365.
- Enter the Password: - Now you have to enter the password of the respective admin
- Enter the Server Name: - Once you have entered the username and password, now you have to add the Server Name of Office 365. In case there in no service name, leave it as default.
- Grant full access rights: - After filing all these details, you now have to grant complete access permission of the mailboxes present inside the server.
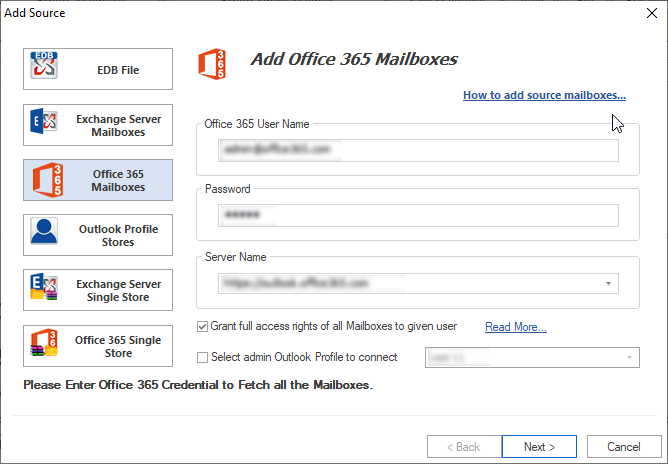
Once all the details have been entered successfully, you must now click on the Next button. There are chances that you might an error message. In that case, you must ensure whether the entered user name has a mailbox under this name in Office 365, if not, you can select other option, i.e. 'Select admin Outlook Profile to Connect.'
If you chose to click on Select admin Outlook Profile to Connect, you need to select the Outlook Profile and click on the Next button thereafter.
However, there are chances that you might again see an error message. In that case, we will recommend creating an Outlook Profile of the admin of Office 365. You must make ensure that it is online and use Outlook Profile Stores.
After executing all the above mentioned steps, you will now see the software displaying all the mailboxes stored in the server. Now, you can select multiple mailboxes as per your preference and can export and save them in the desired files.
Method 3: Outlook Profile Stores
For this particular method, you need to Select the Outlook Profile of Exchange Server user in Office 365. In case you do now have an Outlook Profile of Exchange Server, you can create a new Outlook Profile from the Control Panel.
Now, all you have to click on Next button of the software. It will allow fetching all the mailboxes from the concerned Outlook Profile. In case you are unable to retrieve the Mailbox Stores using these options, you need to check 'Get Address List.'
Once you have completed all the above-mentioned steps, the software would now display the mailbox stores. Now you can select multiple mailboxes as per your preference, thereafter export and save them to desired files.


Related Blogs
- How to Export Exchange Mailbox to EML file Format?- Trusted Solution
- Ways to Extract Exchange Mailboxes data From EDB Files- Sophisticated Solution
- Your mailbox has been temporarily moved to Microsoft Exchange Server – Solution
- Ways to Decommission On-Premises Exchange Server While Deploying in a Hybrid
- How to Restore Active Corrupt Exchange 2016 Database to New Server?