Migration Advance Option
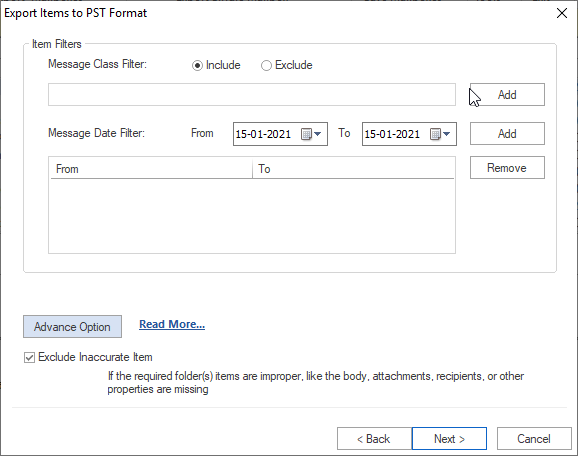
Item Filter:1) Message Class Filter:
Using this filter option, you can easily filter out the items that are based on Message Class. The target user can add all the message class just by using the ADD button. The user can also use 'Include' or 'Exclude' option for the chosen message class.
- If you want to open to the message class dialog box, make sure you click on the 'ADD' button. The box that pops up in front of your screen displays some default messaged inside the dialogue box. The user has the complete authority to uncheck any messages as per his/her wish. In case, you need to add a new message, you must the type the message class in the class and click 'ADD' tab to execute the process.
2) Message Date Filter:
Using this filter option, a user can easily filter all the messages according to the data range. In case, you want to add a new date range, you may click on the 'Form' date field and also the 'TO' date field. Now click on the 'ADD' button to execute the process.
Advance Option
You can open a new dialogue box by clicking on the 'Advance Option' button. The dialog box has all the options that a user might need according to his needs.
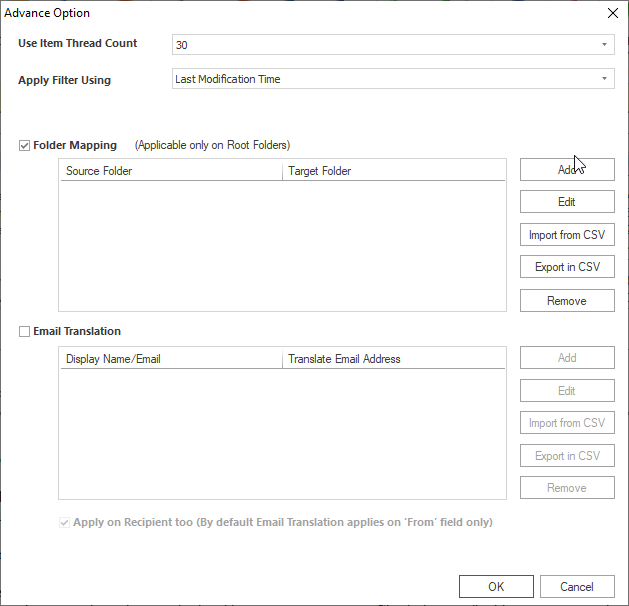
1. Use Item Thread Count: This option lets the user to select the particular thread count that range between 1 to 50. The thread count helps the users to increase the speed of the migration process by running multiple numbers of threads at once.
2. Apply Filter Using: This filter options contains many options that allow user to select the data type to compare it with the date filter.
The options available to user are:- Last Modification Time
- Message Creation Time
- Message Delivery Time
- Client Submit Time
However, by default, the system will take the filter option, 'Last Modification Time.'
Note: In case if you want to execute Incremental migration, you must select: The Date before the starting of last migration in "From" field and the date next to the present date (from when Incremental migration is taking place) in "To" field .
3. Export hard deleted items to "Deleted" folder:- You need to enable this option. It will allow you to export the hard deleted items to a 'Deleted' folder on the target user.
4. Folder Mapping: Folder mapping option helps you to Map the source mailbox folder with the target source mailbox folder for any source folder in front of you. You can also create a new custom folder for any of the given source folders. In order to Map the folder, you need to click on 'ADD' tab. Once done, enter the source folder name in the text box and your target folder name in the target folder box.
5. You can also import the mapping of the names of the folders from the source CSV fie. Use 'Import From CSV' button. You can also export the mapping to the target source CSV file using 'Export in CSV' button.
These options are meant for:- Add: Use it to add the new entry of folder mapping.
- Edit: Use it to add the selected folder mapping from the list in front of your screen.
- Import from CSV: Use this option to import the folders' mapping list from the target source CSV file.
- Export in CSV: Use this option to export the folders' mapping list from the target source CSV file.
- Remove: Use this option to remove the folder mapping entries from the list in front of your screen.
Email Translation: Email Translation helps you to change all the source folders' email address by using new email address that will only be visible on the newly exported email items. In case you want to enter the target source email translation, you need to click on the 'ADD' button. Once done, enter the source email address in the text box and add the new email address in the target source box and click on 'OK' tab.
The users can also import the email translation list from the target source CSV file by clicking on 'Import From CSV' button. The same can be done to export the email translation list to a different CSV file using 'Export in CSV' button.
These options are meant for:
- Add: Use this option to add the new email translation.
- Edit: Use this option to edit the chosen email translation.
- Import from CSV: Use this option to import the email translation list from the target source CSV file.
- Export in CSV: Use this option to export the email translation list to the target source CSV file.
- Remove: Use this option to remove the chosen email translation entries.
- Apply on Recipient too: Use this option to enable the email translation process for the recipients. However, email translation by default works only for the ‘From’ field of the email translation item.
- Boost Item Fetching: Boost Item Fetching option lets you boost the speed of the fetching the mailboxes data from the target source server. You shall always use this option in case you are applying date filter and for migration.
Now, you just need to click on the 'Next' button to continue the process.


Related Blogs
- How to Export Exchange Mailbox to EML file Format?- Trusted Solution
- Ways to Extract Exchange Mailboxes data From EDB Files- Sophisticated Solution
- Your mailbox has been temporarily moved to Microsoft Exchange Server – Solution
- Ways to Decommission On-Premises Exchange Server While Deploying in a Hybrid
- How to Restore Active Corrupt Exchange 2016 Database to New Server?